Video Production 20S
- 2024 ONLINE CLASSROOM LEARNING -
Mr. Halstead
PTSD Email: [email protected]
Slot 2 - Lab 105
Foley Rubric
Film Project 6 - Foley Short Film
Instructions:
-This project will focus on creating foley (sound for film).
-You will create a short film that has a minimum of three scenes with a minimum of three different uses of foley added to your film.
-After the credits, you will include a 'Behind the Scenes' or 'The Making of' to show how you made the sound effects.
Step 1 - Pre-production:
-Write a script for your short film that includes at least three different scenes.
-These short scenes must have something happen in it that you can create foley (sound effects) for it.
-We will cover how to create a script in Video Production 30S, so it does not need to follow the proper format but you are encouraged to do so if you would like.
At the top of your script you need to identify the:
-cast
-crew
-locations where filming takes place
-costume
-props
-the items you will need to create your foley (sound effects).
Step 2 - Production:
Film the first scene. Remember it is recommended to have 3-5 different takes with multiple angles so you have more to work with in post production.
Repeat this at least two more times so that you have at least three scenes for you final foley film.
Step 3 - Production:
Complete the foley sound effects while watching your filmed clips so you can match up the sounds as best you can. You will need to film how you created those sounds so you can use them in your 'Behind the scenes' or 'Making of' reveal in your film.
Step 4 - Post Production:
1. Add the foley you created.
2. Add the title for your short film.
3. After the scenes (with foley), add a title (Behind the Scenes or Making of).
4. Include a side by side of the scenes and clips of you making the foley for that particular scene (watch the video tutorial related to this).
Credits to include at the end of your film:
Director:
Writer:
Editor:
Executive Producer: Mr. Halstead
Assistant Producer: Mr. Manness
Lighting Director:
Camera Operator:
Foley Artist:
Cast:
Filming Locations:
Soundtrack:
Composer:
Writer:
Editor:
Executive Producer: Mr. Halstead
Assistant Producer: Mr. Manness
Lighting Director:
Camera Operator:
Foley Artist:
Cast:
Filming Locations:
Soundtrack:
Composer:
Introduction to Foley: What is Foley and how is it used in film?
|
|
|
|
|
|
Film Project 5 - Timelapse
This is will be working in groups of 2-3 in the Production phase of filming 2 min. each day in the exact same location outside. The goal is to film the tracking of the progress of the fall and then use that footage for individual Post Production to create a timelapse.
Reminder to rename your files each time so it is easy to identify the order of the clips. For example, name the first file TL Day 1, then TL Day 2, etc.
Reminder to rename your files each time so it is easy to identify the order of the clips. For example, name the first file TL Day 1, then TL Day 2, etc.
Timelapse Film Rubric

HOW TO SIGN OUT A CAMERA AND TRIPOD:
Step 1: Find the camera class sheet for the sign out/in.
Step 2: Write down all group members using the camera.
Step 3: Write down
-the camera number that you have,
-the date and
-location where you are going to film
Step 4: Check off the OUT column to indicate you have that camera.
Step 5: Get a camera from Mr. Halstead.
Step 6: Set your timer or alarm on your phone to give you 15 minutes before class ends to return to the room and upload your clips.
Step 7: Go to your location and film.
Step 8: Return to the room, upload your clips to each mac (Eject SD card properly from the Mac, put the SD card back in the camera).
Step 9: Return the camera to Mr. Halstead to put away.
Step 10: Check off the IN column in.
Guidelines for filming this semester:
|
-THIS IS YOUR ONE WARNING TO FOLLOW ALL EXPECTATIONS OF STUDENT BEHAVIOUR WHILE OUT FILMING.
-Set a timer on your phone to return to class with 10-15 remaining in class. -No running within the school. -Never walk backwards. -No mock fighting (unless pre-approved and choreographed). -No weapons used. -No students (friends) can be pulled from other classes to be used in filming. -No filming in the front hallway by the office. -Noise kept to a minimum while classes taking place. -If a teacher asks you to move, you must move to another location to film. |

|
Lyric Music Video Rubric
Film Project 4 - Lyric Video
In this project, you will watch the example videos on this page and decide what song you would like to make a lyric video for. You will film clips that are abstract and include camera movements but cannot include people. Individuals in the distance is okay but not acting in the film.
Download the audio of the song you would like to include in your film using ClipGrab and identify each in the credits.
Important points:
1. The song must be appropriate for an audience comprised of ages 10-100 years old.
2. The maximum length of the film should be 3 min. You may need to seamlessly edit your song or fade it out if longer.
3. Copy the entire song lyrics to an online document and print and hand in prior to starting your film.
4. Use the online document to copy/paste the lyrics to avoid spelling and grammar errors. If you choose to type it out yourself, that is acceptable but be careful of errors.
5. Font styles, sizes and colours can enhance your lyrics.
6. Use rulers and guides to make sure your lyrics are appearing in several of the same areas on screen (see the video tutorial).
6. You will be applying several camera movements while filming your video clips.
7. Include a title and credits.
8. Make something you are proud of and have fun!
Example of Rough Cut 1 - with Lyrics Synced to Music:
Example of Rough Cut 2 - with Video Clips added and edited to sync with lyrics & music
Course notes 4 (29 minutes):
Storyboarding Rubric
Film Project 2 - Storyboarding for Jaws/E.T./Star Wars: Empire Strikes Back
Instructions:
1. Create a new folder in your class folder and name it FP 3 - Storyboarding.
2. Download the film scene you have selected using ClipGrab and make sure it is in your new FP3 folder.
3. Using your storyboard, take a photo of each panel using an iPhone or iPad.
5. Watch the video below on How to Add Photos and Resize Video Layers.
6. Complete yours in the same manner, include a title and credits.
7. Read the Storyboarding Rubric carefully prior to completing the film project.
8. Export as H.264 format.
9. Make sure to rename the video file to Your First Name FP3.
10. AirDrop to macair3000 to hand in.
Due Friday March 8, 2024
Credits to include at the end of your film:
Directed by: your full name
Edited by: your full name
Executive Producer: Mr. Halstead
Assistant Producer: Mr. Manness
Storyboarding: your full name
Film Clips from: which film did you choose
Edited by: your full name
Executive Producer: Mr. Halstead
Assistant Producer: Mr. Manness
Storyboarding: your full name
Film Clips from: which film did you choose
Pre-Production - Storyboard Assignment (12 completion marks)
Instructions:
1. You will receive a Storyboard template sheet to sketch your storyboard panels and add descriptions for each.
2. You have now watched all three of the iconic movie scenes (Star Wars, Jaws, E.T.) and now must decide which movie scene you would like to storyboard.
3. There will be more than 6 camera angles so you must decide what is the most important things to sketch for your storyboard panels.
4. Under the 6 storyboard panels, write a brief description of what is happening in the panel you've sketched.
5. If you would like to add more panels, turn the page over and draw more if you like.
6. Use the pencil provided, add as much detail as you can to your sketches.
Due Wednesday March 5th, 2024 .
Example of a storyboard:

Six Panel Storyboard Template:
| a4_storyboard_template_-_6-panel_-_portrait_-_studiobinder.pdf |
Iconic Film Scene: E.T.: The Extra-Terrestrial
Iconic Film Scene: Star Wars - The Empire Strikes Back
Iconic Film Scene: JAWS
Composition Project Rubric
Credits to include at the end of your film:
Directed by: your full name
Edited by: your full name
Executive Producer: Mr. Halstead
Assistant Producer: Mr. Manness
Film Clips from: list all that you used
Music: identify the song you used
Edited by: your full name
Executive Producer: Mr. Halstead
Assistant Producer: Mr. Manness
Film Clips from: list all that you used
Music: identify the song you used
How long should Film Project 2 be?
Each clip should be three seconds in length. Therefore, about 70-80 seconds.
-18 clips x 3 seconds = 54 seconds plus;
-title (3 seconds) and;
-credits (10-15 seconds, depending on how many different credits you listed)
How to add Lower Third Titles and Backgrounds
Film Project 2 - Composition
In cinematography, composition refers to the frame of the image and how the elements captured appear in it.
Composition guidelines must be observed when telling stories visually, as in filmmaking.
Composition guidelines must be observed when telling stories visually, as in filmmaking.
Instructions:
1. Create a new sub folder for FP2 - Composition
2. Using your notes from the three videos, go to YouTube to find film trailers or scenes (different from the three instructional videos) that you could use for your examples in your film.
3. Download the film trailers or scenes you have selected using ClipGrab and make sure it is in your new FP2 folder.
4. Use lower third titles to display the different names of each type of camera size, framing or angle.
The types of examples you need to include from each video:
-Camera Size (8 of 9)
-Camera Framing (5 of 9, cannot all be from the first 1-5)
-Camera Angles (5 of 9)
5. Watch the video below on How to Add Lower Third Titles.
6. Include the title - Composition
7. Include credits (don't forget to add all the films you used).
8. Remove the audio from the film clips you are using and add instrumental music for your film (one song, no singing).
9. Make sure to rename the video file to Your First Name FP2.
10. AirDrop to macair3000 to hand in.
Due Tuesday Feb. 27th, 2024
How to AirDrop your Project (to macair3000):
Course notes 3 (13 minutes):
ADDING TO YOUR NOTES, IN YOUR OWN WORDS, BRIEFLY EXPLAIN THE FOLLOWING:
1. LOW ANGLE (LA)
2. HIGH ANGLE (HA)
3. OVERHEAD
4. DUTCH ANGLE
5. EYE LEVEL
6. SHOULDER LEVEL
7. HIP LEVEL
8. KNEE LEVEL
9. GROUND LEVEL
1. LOW ANGLE (LA)
2. HIGH ANGLE (HA)
3. OVERHEAD
4. DUTCH ANGLE
5. EYE LEVEL
6. SHOULDER LEVEL
7. HIP LEVEL
8. KNEE LEVEL
9. GROUND LEVEL
Course notes 2 (15 minutes):
ADDING TO YOUR NOTES, IN YOUR OWN WORDS, BRIEFLY EXPLAIN THE FOLLOWING:
1. SINGLE
2. TWO SHOT
3. THREE SHOT
4. FOUR SHOT
5. FIVE SHOT
6. CROWD SHOT
7. OVER THE SHOULDER (OTS)
8. POINT OF VIEW (POV)
9. INSERT SHOT
1. SINGLE
2. TWO SHOT
3. THREE SHOT
4. FOUR SHOT
5. FIVE SHOT
6. CROWD SHOT
7. OVER THE SHOULDER (OTS)
8. POINT OF VIEW (POV)
9. INSERT SHOT
Course notes 1 (15 minutes):
USING THE PAPER PROVIDED, IN YOUR OWN WORDS, BRIEFLY EXPLAIN THE FOLLOWING:
1. ESTABLISHING SHOT
2. MASTER SHOT
3. WIDE SHOT (WS)
4. FULL SHOT (FS)
5. MEDIUM FULL SHOT / COWBOY
6. MEDIUM SHOT (MS)
7. MEDIUM CLOSE UP (MCU)
8. CLOSE UP (CU)
9. EXTREME CLOSE UP (ECU)
1. ESTABLISHING SHOT
2. MASTER SHOT
3. WIDE SHOT (WS)
4. FULL SHOT (FS)
5. MEDIUM FULL SHOT / COWBOY
6. MEDIUM SHOT (MS)
7. MEDIUM CLOSE UP (MCU)
8. CLOSE UP (CU)
9. EXTREME CLOSE UP (ECU)
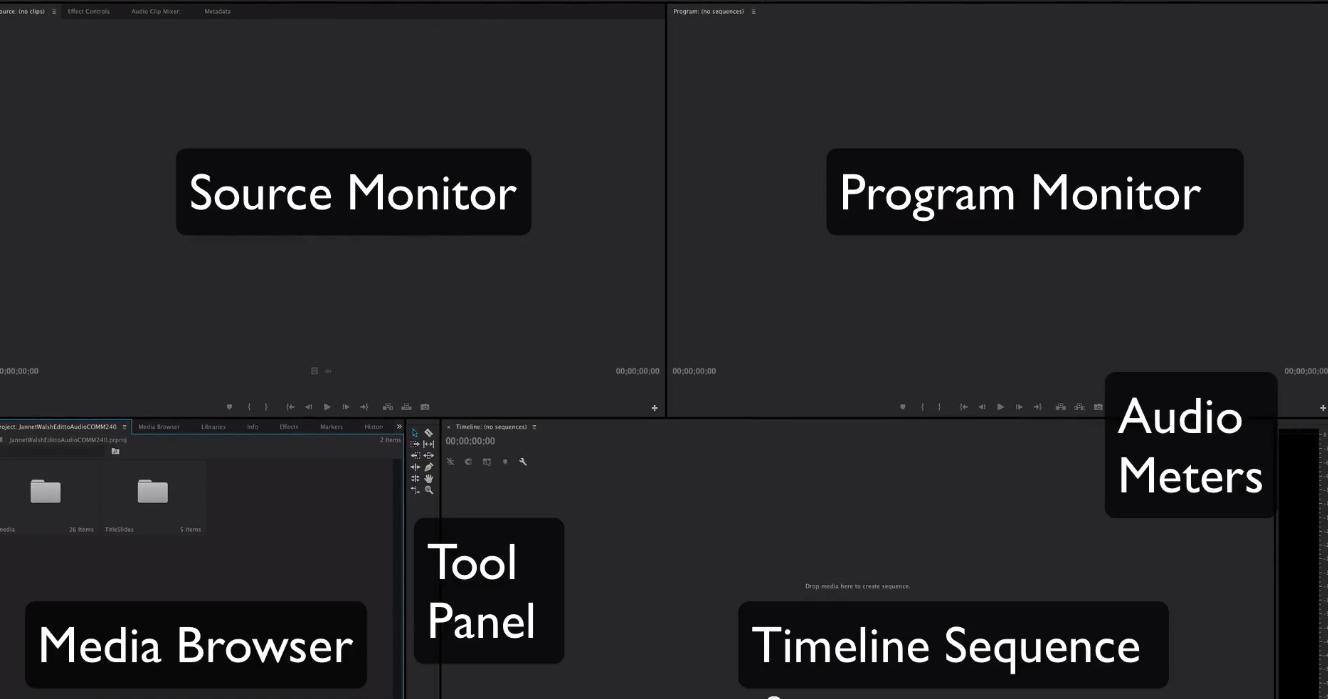
Premiere Pro - Workspace - Editing:
Start a Film Project in Adobe Premiere Pro (Film Project 1 - Film Rec)
In class, watch the video below and follow along to learn how to start a film project in Adobe Premiere Pro.
Import one of the film trailers you downloaded first and use to build your sequence.
FOLLOW THE VIDEO BELOW, CREATE YOUR FIRST PREMIERE PRO PROJECT AND SHOW MR. HALSTEAD ONSCREEN ONCE FINISHED.
Import one of the film trailers you downloaded first and use to build your sequence.
FOLLOW THE VIDEO BELOW, CREATE YOUR FIRST PREMIERE PRO PROJECT AND SHOW MR. HALSTEAD ONSCREEN ONCE FINISHED.
PRE-PRODUCTION:
1. Complete your script using the paper provided to you and use the film recommendation instructions as a guide for what to say.
PRODUCTION:
1. Find a suitable location
2. Set up your recording device (phone, tablet, camera and tripod, etc.). Check to make sure it's in focus while recording
4. Record 3 takes of your film review
5. Bring recording device (phone, tablet, camera and tripod, etc.) to class to upload your video of your three takes
POST-PRODUCTION:
1. Upload footage to your PROJECT 1 FOLDER
2. Preview each clip to ensure video is in focus (if not, go back and re-shoot your review)
3. Download your trailer to your PROJECT 1 FOLDER (watch the video below how to use CLIPGRAB)
4. Open Adobe Premiere Pro (video instructions posted later this week).
How to download using ClipGrab:
Located in the DOCK or in FINDER - APPLICATIONS - locate CLIPGRAB
- double click to open CLIPGRAB
***IF THIS APP IS NOT WORKING, IT USUALLY REQUIRES AN UPDATE - ASK MR. HALSTEAD FOR HELP WITH THIS.
- copy your YouTube link URL
- paste in CLIPGRAB
- select which quality you want -USE MPEG 4 (720p) is ideal
- click GRAB THIS CLIP!
- locate your folder you'd like it to download to (for example, Film Project 1 - Film Recommendation)
This is the icon for the ClipGrab application:

ClipGrab

Pre-Production - Script Assignment
Instructions:
1. You will receive a long, blank sheet of paper to use as your script and a pencil.
2. Watch the video below of The Last of Us episode 1 review. This is a typical example of a YouTube channel review.
3. Click on the link below called Film Recommendation (in orange) to get ideas on what you might want to say in your script.
4. Write your name at the top of your script and what film or show you are recommending.
5. At the end of class, hand in your script paper and pencil.
6. You will have more time to complete later in the week.
Film Recommendation
Example of a film and show review:
Top 12 guidelines for working in the Mac lab this semester:
1: Sit at the same computer every day.
2: Only allowed access to the desktop folder for your slot (for example, Slot 2)
3: NEVER change anything in the settings (for example, the background photo)
4: Create a folder with your name on it, in the appropriate desktop folder (for example, if you are in slot 2 - open the slot 2 desktop folder and create a folder with your name on it.) This is the location for all the coursework folders you will have for each film project.
5: There will be some groupwork for filming in this course but everything handed in is an individual film project.
6: Arrive to class on time.
4 Lates = 1 Absence.
8 Absences = Contacting home, counsellor
10 Absences = Course Continuance Contract and further absences may result in removal from the course.
Out of the room for 20 min or more = Absent for class that day
7: Treat everyone in the room with respect at all times.
8: Treat all the equipment in the room with respect at all times.
9: If your computer requires a login, select FRC Admin and the password is: 2757520
10: No games permitted at any time.
11: Cell phones are for classwork only (for example: filming, timer, notes, Edsby)
12: Be creative, produce work you are proud of and have fun.
Creating a Film
Storytelling is the conveying of events in words, sound and/or images, often by improvisation or embellishment. Stories or narratives have been shared in every culture as a means of entertainment, education, cultural preservation, and instilling moral values.
It's best to think of it as three distinct stages: planning and getting ready to film (pre-production) filming (production), and. completing the film and getting it ready to show (post-production).
Pre-Production - Production - Post Production

Pre-Production:
The pre-production phase of a project is where all the planning takes place before the camera rolls. Whether its Scripting & Storyboarding – this planning phase sets the overall vision of the project. Pre-production also includes working out the shoot location and casting. You’re in pre-production mode the moment you start writing down a few points to cover in a video even if it is a short piece made for a blog. As your projects become more ambitious you can start to storyboard the project. Storyboards can really smooth out the post-production process when it’s time for editing. This will really be useful if there are multiple people working on the project.
Production:
Production begins once the footage is recorded. This process will capture all the scenes and information captured in the pre-production process. During the production process you apply various the lighting requirements, framing and work on composition. Some projects will also shoot B-Roll during the production process. B-Roll is supplementary footage that can be included in the finished product.


Post-Production:
The post production process begins after all the footage has been captured. This is actually one of my favourite parts of the video making process. Graphics can be added along with images, music, colour correction and special effects. If you are producing your own video content there will be a bit of a learning curve at first, but it will be really rewarding. Post-production is like putting the last coat of paint on in a room and it will be well worth the time to learn the basics. This is where your video project will really come to life.
